Integrate your PHP-based website with our SDK to start accepting payments using the Razorpay Payment Gateway.
Razorpay has developed the Standard Checkout method and manages it. You can configure payment methods, orders, company logo and also select custom colour based on your convenience.
Ensure that you are using 5.6 or a higher version of the SDK. Download the latest version of the SDK from GitHub.
PREREQUISITES
Create a Razorpay account.
Log into the Razorpay Dashboard and generate the API keys in test mode.
Integration Steps
Follow these integration steps:
Build Integration
Test Integration
Go-live Checklist
integrate Razorpay Payment Gateway with your PHP website. The integration process is explained using the PHP sample app.
Download Razorpay PHP SDK
Add SDK file to your project
Create an Order in Server
Add Checkout Options
Store Fields in Server
Verify Payment Signature
Verify Payment Status
Download Razorpay PHP SDK
You can either download or run a composer command to install Razorpay PHP SDK.
Use Composer Command
You can install Razorpay using a composer command. please reffer the right side image for your refference
Add SDK file to your Project
Unzip the SDK file and include the Razorpay.php file in your project.
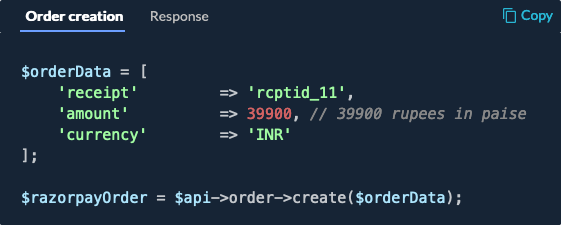
Create an Order in Server
Order is an important step in the payment process.
An order should be created for every payment.
You can create an order using the Orders API. It is a server-side API call. Know how to authenticate Orders API.
The order_id received in the response should be passed to the checkout. This ties the Order with the payment and secures the request from being tampered.
API Sample Code
In the sample app, the pay.php file contains the code for order creation using Orders API.
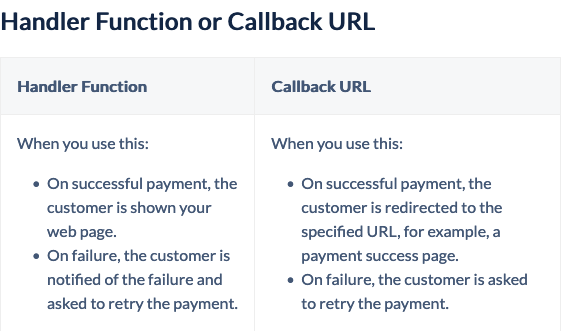
Add Checkout Options
Add the Razorpay Checkout options in your project. For example, if you are using HTML for your frontend, create a page called pay.html and add the Pay button on your web page using the checkout code, Handler Function or Callback URL.
Store Fields in Server
A successful payment returns the following fields to the Checkout form.
You need to store these fields in your server.
You can confirm the authenticity of these details by verifying the signature in the next step.
Verify Payment Signature
This is a mandatory step that allows you to confirm the authenticity of the details returned to the checkout for successful payments.
To verify the razorpay_signature returned to you by the checkout:
Create a signature in your server using the following attributes:
order_id – Retrieve the order_id from your server. Do not use the razorpay_order_id returned by checkout.
razorpay_payment_id – Returned by checkout.
key_secret – Available in your server. The key_secret that was generated from the Razorpay Dashboard.
2. Use the SHA256 algorithm, the razorpay_payment_id and the order_id to construct a HMAC hex digest.
3. If the signature you generate on your server matches the razorpay_signature returned to you by the checkout, the payment received is from an authentic source.
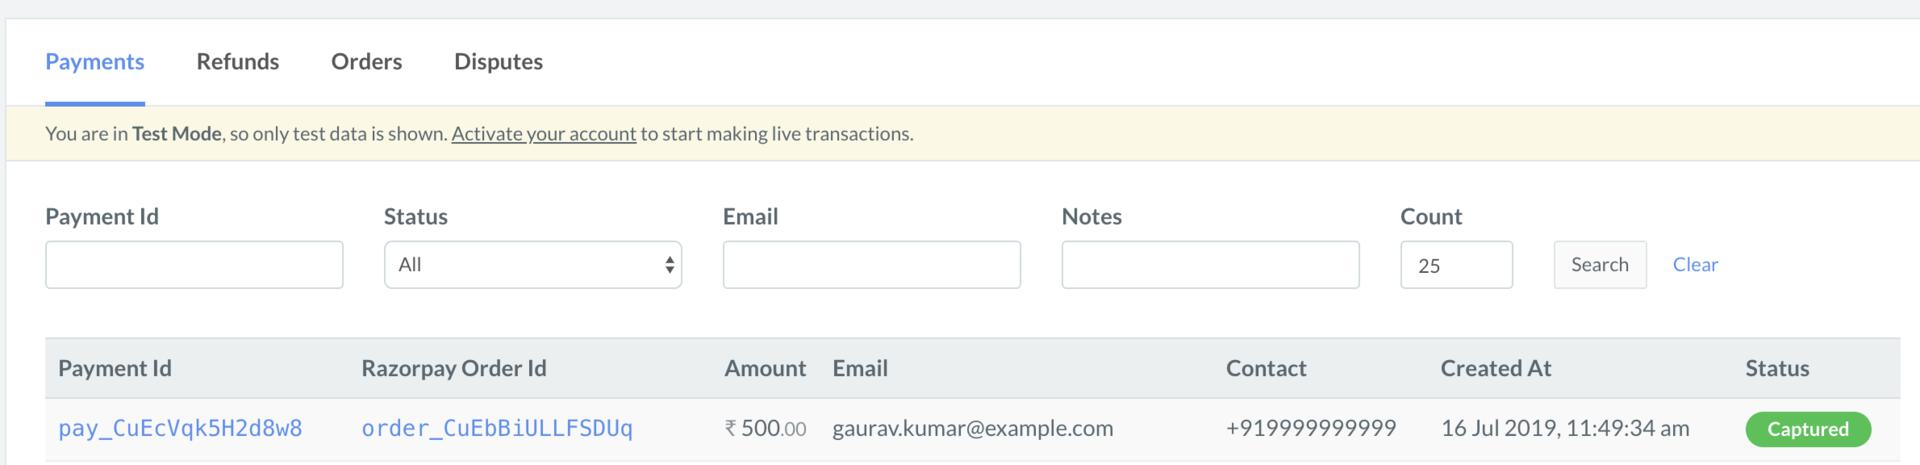
Verify Payment Status
You can track the status of the payment from the Razorpay Dashboard, subscribe to the Webhook event or poll our APIs.
From the Dashboard
Log into the Razorpay Dashboard and navigate to Transactions → Payments.
Check if a payment_ID has been generated. If no payment_ID has been generated, it means that the transaction has failed.
Subscribe to Webhook events<
You can subscribe to a Webhook event that is generated when a certain event happens in our server. When one of those events is triggered, Razorpay sends the Webhook payload to the configured URL.